Food Thermometers: How to Calibrate and More
We all know that maintaining or cooking foods to certain temperatures is essential to preventing foodborne illnesses.
But just as important is knowing how to correctly use and calibrate food thermometers to make sure your temperature readings are correct.
While many food handlers believe that changes in color can be used to indicate doneness, color is not a reliable indicator of whether a food has reached a safe internal temperature.
Instead, the only way to truly measure whether food has reached a safe internal temperature is with the use of a food thermometer.
This article explains everything you need to know about food thermometers, including the various types and their uses as well as how and when to calibrate them.

Types and uses of food thermometers
There are several types of food thermometers available.
Each varies in temperature read speed, food placement depth, and ability to be calibrated, among other factors.
Here’s an overview of the different types of food thermometers (1):
| Category | Type | Speed | Placement | Pros and Cons |
|---|---|---|---|---|
| Digital Food Thermometers | Thermocouple | 5 seconds | 1/2″ deep | • Fastest reading • Good for thick and thin foods • Not designed to remain in food • Can be calibrated • More costly and difficult to find in stores |
| Thermistor | 10 seconds | 1/2″ deep | • Fast reading • Good for thick and thin foods • Some models can be calibrated • Easy to find in stores | |
| Oven cord | 10 seconds | 1/2″ deep | • Designed to remain in food while it’s cooking in the oven or in a covered pot • Can also be used outside of the oven • Cannot be calibrated | |
| Thermometer fork | 2–10 seconds | 1/2″ deep | • Not designed to remain in food • Cannot be calibrated • Good for grilling | |
| Dial Thermometers | Oven-safe bimetallic | 1-2 minutes | 2″ deep | • Not appropriate for thin foods • Can remain in in foods • Can cause a false reading • Some models can be calibrated |
| Instant-read, bimetallic | 15–20 seconds | 2″ deep | • Difficult to measure thin foods • Not designed to remain in food • Some models can be calibrated | |
| Other | Liquid-filled | 1-2 minutes | 2″ deep | • Cannot measure thin foods • Cannot be calibrated • Can cause false high readings |
| Single-use | 5–10 seconds | 1/2″ deep | • Designed to be used once • Should only be used with foods for which they’re intended |
Infrared is another type of thermometer, but it measures surface temperature only.
Therefore, it’s not an inaccurate representation of internal temperature.
The surface temperature of a food is likely to be much higher than the internal temperature, which is what we really care about to ensure the destruction or reduction of bacteria that lead to foodborne illnesses.
Therefore, you should never use an infrared thermometer to determine whether food reaches a safe internal temperature.
However, you can use an infrared thermometer to find hot or cold spots in baking ovens or measure the surface temperature of a grill or skillet.
Of the various thermometer types, instant-read, bimetallic stemmed thermometers tend to be the most commonly used since they are relatively inexpensive, accurate, and easy to calibrate.
You must insert the sensing area of the bimetallic stemmed thermometer at least two inches into the food to give an accurate reading.
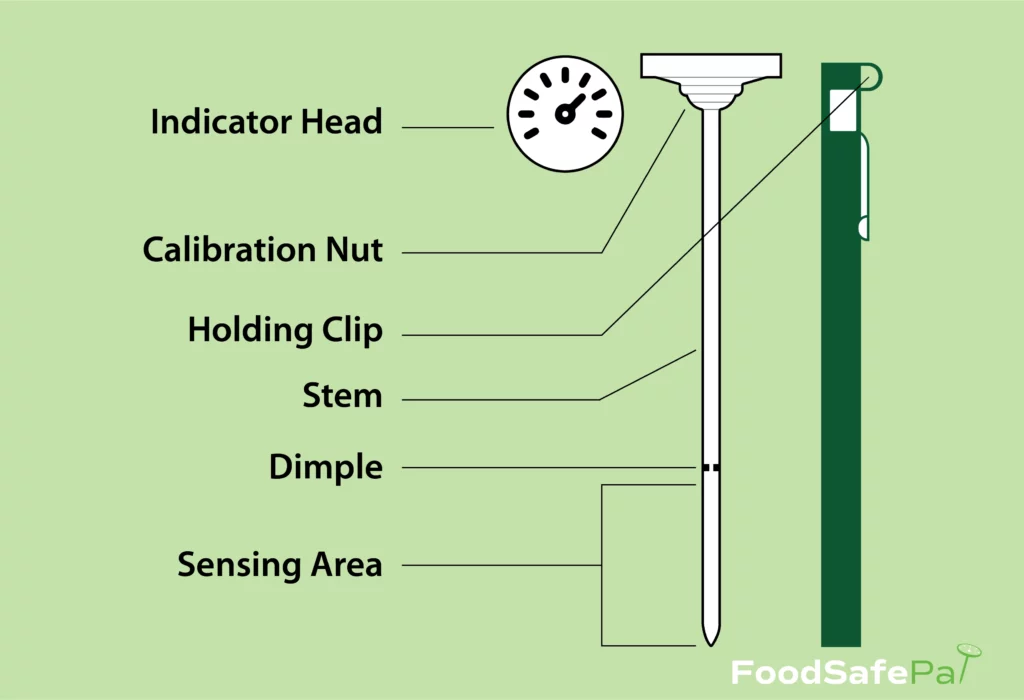
Here’s what a bimetallic stemmed thermometer looks like and its anatomy:

Summary
There are several types of thermometers, each varying in temperature read speed, food depth placement, and ability to be calibrated, among other factors.
How to calibrate food thermometers
Tools are only useful if they work properly, and food thermometers are no different.
Food thermometers that become uncalibrated will give you an incorrect reading, which if off just a few degrees, could allow bacteria to survive and cause foodborne illnesses.
Therefore, it’s important to regularly calibrate your thermometers using substances with a known temperature — like ice or boiling water.
Ice water method
Adjusting a thermometer based on the temperature at which water freezes is called the ice water method.
The ice water method — also known as the freezing-point method — of food thermometer calibration uses a cup or bowl filled with ice water.
Water freezes at 32ºF (0ºC) so your thermometer should read the same temperature in a water ice bath.
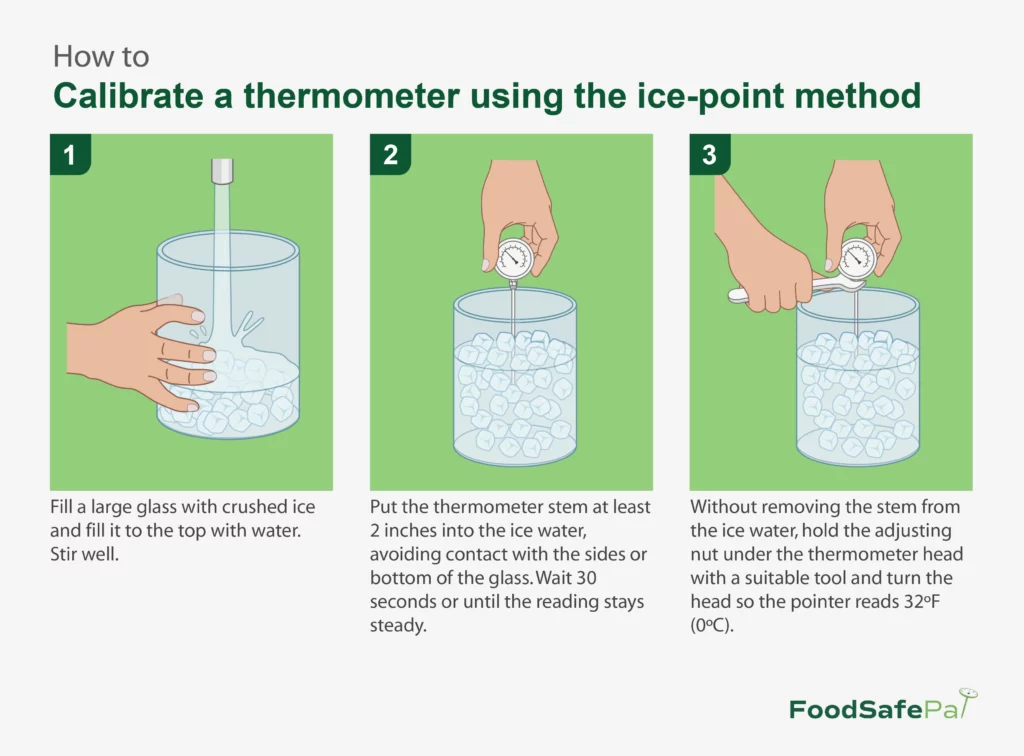
Here are the steps to calibrate your thermometer using the ice water method:
- Fill a large glass with finely crushed ice and fill it to the top with water. Stir well.
- Immerse the thermometer stem at least 2 inches into the mixture, avoiding contact with the sides or bottom of the glass.
- After at least 30 seconds of submersion, and without removing the stem from the ice, hold the adjusting nut under the thermometer head with a suitable tool and turn the head so the pointer reads 32ºF (0ºC).

Boiling water method
The boiling water method uses a pot of boiling water to calibrate a food thermometer.
Using this method, your thermometer should read 212ºF (100ºC) — the temperature at which water boils at sea level.
However, at higher elevations, water boils at a lower temperature, so if you use this method, make sure you know the temperature at which water boils in your areas to ensure accuracy (2).
For example, at 7,500 feet, water boils at about 198ºF (92ºC).
Here are the steps to calibrate your thermometer using the boiling water method:
- Bring a pot of distilled water to a full, rapid boil.
- Immerse the thermometer at least 2 inches into the pot (You can place the thermometer stem through the clip of the sheath and hold the sheath horizontally to avoid burning your hands).
- Without removing the stem from the pot, hold the adjusting nut under the thermometer head with a suitable tool and turn the head so the pointer reads the water boiling point in your area.

Download these food thermometer calibration steps posters for FREE!
Summary
You can calibrate your thermometer using the ice or boiling water method. Make sure you know the temperature at which water boils in your area if you choose the boiling water method.
When to calibrate food thermometers
Your thermometer should be within 2ºF (1ºC) accuracy. If it is out of this range, you need to recalibrate it (3).
Bimetallic stemmed thermometers are the easiest to calibrate. They have a calibration nut beneath the display dial that you can turn with a wrench or pliers to the proper temperature.
Digital thermometers that can be calibrated usually have a reset button but you should always read the introductions.
If you use a thermometer that you cannot calibrate, you should still verify that it is accurate by using either the ice or boiling water method.
Toss your food thermometer if you cannot calibrate it and it's off by more than 2ºF (1ºC).
Food thermometers can fall out of calibration after long periods without use or if they are dropped or banged around.
Therefore, you should calibrate them regularly, and ideally, before each shift.
Summary
Calibrate your food thermometers — even if they cannot be — often, ideally before each shift.
How to use food thermometers correctly
Just as using an uncalibrated food thermometer can give you a false temperature reading, so too can using them incorrectly.
But before you even think about using a food thermometer, make sure you sanitize the stem to prevent food hazards as a result of cross-contamination or cross-contact.
Cross-contamination occurs when bacteria or other contaminant is introduced into another food that wouldn’t normally contain it.
Cross-contact occurs the same way but with a food allergen, like wheat, eggs, or peanuts.
The most common way to sanitize thermometers is by using an alcohol-based, single-use wipe, but you should always refer to the manufacturer’s guidelines for cleaning instructions.
Always let the thermometer air-dry after cleaning or sanitizing.
When taking the temperature of meats, insert the thermometer into the thickest part, away from bone, fat, or gristle.
If you’re cooking larger items like a beef roast, check the temperature in several places to ensure all areas reach a safe internal temperature.
When measuring the temperature of a thin food (less than 1/2” thick), like a hamburger patty or pork chop, use a digital thermometer like a thermistor or thermocouple if possible.
These thermometers have their temperature sensing area on the tip of the prob rather than several inches up the stem like with a bimetallic stemmed thermometer.
Otherwise, if using a bimetallic stemmed thermometer, insert the probe into the side of the food so the sensing area reaches the center of the food.
Remember to maintain good hand hygiene and use a barrier like tongs or single-use gloves if needed to hold or position food to take its temperature.
Keep a log of food temperatures to ensure that you're cooking foods to safe internal temperatures and cooling them properly.
And don't forget that you need to make sure the food you receive is delivered outside of the temperature danger zone.
For meats, poultry, and seafood, probe the thickest part, just like you would to verify that they have reached a safe internal temperature.
If these items are packaged using reduced oxygen, place the thermometer stem between two packages, being careful not to puncture the package.
You should also use a thermometer to verify that the water of a 3-compartment sink is at the appropriate temperature for washing.
Summary
Take the temperature in the thickest part of a food and avoid contact with bone, fat, or gristle. For a thin item like a hamburger patty, insert the probe through the side so the sensing area reaches the center. Always sanitize the thermometer stem or probe before and after each use, and allow it to air-dry.
The bottom line
You should always use a food thermometer to ensure that you cook food to a safe internal temperature.
There are several types of food thermometers available, each varying in temperature reading speed and food placement depth.
You can use the ice water — or freezing point — or boiling water method to calibrate your thermometers.
Calibrate your food thermometers often, ideally before each shift. Toss any thermometer that cannot be calibrated and is off by more than 2ºF (1ºC).
Temp the thickest part of food and avoid probe contact with bone, fat, or gristle. Insert the probe in the side of thin foods until the sensing area reaches the center.
Sanitize the food thermometer probe or stem before and after each use according to the manufacturer's instructions, and allow to air-dry.


